JANUARY 2011: My Surface Interval named one of the best scuba diving blogs
Showing posts with label equipment. Show all posts

Wednesday, February 18, 2009

Canon G9 Camera Underwater

While pulling together a slideshow of underwater images I got thinking about things have moved on since my first camera. As some of you may be looking to upgrade from your point and shoot, here's a review of the Canon G9 instructor Jason Clarke posted on the Dive Magazine website. The review won him a set of Poseiden regs (I have the same camera and wish I'd got a review in first)

PERFECT FOR THOSE WHO HAVE OUTGROWN THEIR COMPACT CAMERAS

Strengths: the option for full manual functions will give you greater control over how your photos turn out and RAW function allows for greater fiddling on a PC afterwards.

Weaknesses: Takes a bit of getting used to. Also the Canon housing doesn’t allow for wide angle or wet lenses to be attached. If that is your thing, you will need to purchase the more expensive Ikelite housing.

Overall: The advent of compact digital cameras and watertight housings has revolutionized underwater photography, giving us chance to share our experiences with people not yet converted to life with an aqualung.

Inevitably, there will be some of us who will outgrow our simple point-and-shoot models as we aspire to replicate the images of the likes of Alex Mustard or David Doubliet.
However, the thought of trying a digital SLR will leave a lot of us in dread. Too expensive, too fiddly and you’d need some sort of degree to learn how to use one, I thought.


But after much searching I’ve discovered the Canon G9 which I bought with a Canon WP-DC21 housing. It’s slightly bigger than your average compact but comes with a wealth of manual functions usually found only on SLR cameras, thus providing a perfect bridge between the two vastly different disciplines.
More experienced photographers can better explain the qualities of the camera so I’ll just stick with its underwater uses.The camera comes with all the gubbings you’d expect if buying one of its compact cousins (cables, software etc) and operates in exactly the same way.
However, turn the dial to full manual and it opens up a world of new things to try to improve your photos. Crucially, the camera gives you control of shutter speeds and aperture, two key elements in controlling the amount of light hitting the sensor and affecting how your pictures turn out.
On land, the functions are operated by a simple wheel with your thumb. Underwater, it involves pressing a couple of buttons. My advice, read the manual that comes with the Canon housing. Skip through any number of underwater photography forums and you will find countless divers have discounted the G9 because they didn’t think the manual functions would be available to them beneath the waves.
White balance and ISO control can also be controlled manually and there is a macro setting. There is also scope for a slave flash with the Canon housing.


The G9 also lets you shoot in RAW format, effectively a digital negative that has had no post-shot processing done by the camera and is perfect for those who link to tinker with their shots on a PC afterwards.
Getting good results with the G9’s manual functions does take a bit of work. A professional photographer friend recommended experimenting lots on land so they become second nature. But with digital, it doesn’t matter because it doesn’t cost you anything. Such is the quality of the camera, he even bought one as a back-up.
After eight months playing with the camera, my pics are slowly improving and I’ve discovered that, underwater, there are colours other than differing shades of blue.
Comparing shots I take now with my first scuba snaps and I’ve come on in leaps and bounds.And with automatic functions just a twist of the dial away, you can always use it like any other compact to make sure you don’t miss that (possibly) once-in-a-lifetime shot as I did when a whale shark swam past us in Sharm in June.
There is one major sticking point however. Due to the shape of the housing port it is not possible to attach wet lenses such as wide angle or macro. I only discovered this after buying the camera. It now means another £500-ish outlay for an Ikelite housing for when I want to make the next step forward.
That aside, this is a perfect camera for taking those baby steps towards publication-quality pics

Friday, January 30, 2009

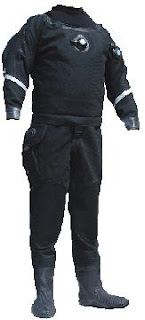
New Scuba Diving Dry Suit

Sorting out my kit after the weekend's fun at Dosthill, I realised why my feet were so cold - a small leak in my trusty Oceanic HD400 dry suit had left my boots more than a little damp.

I can't complain thought, it's been a great suit for the money and is perfect for new divers faced with trying to get kitted up.

I've been thinking of changing it for a while and rather than spend money on repairing a suit that has lasted me five years, I've decided to upgrade.

But, with so many suits on the market, the decision on what suit to have next has left me more than a bit confused.

Everyone of the instructors I assist rave about their DUI dry suit. While I can't disagree with the sentiment over the Aston Martin of dry suits, they are a tad expensive and, being American made, the price has just gone up due to the falling value of Sterling (even us divers are not immune from the credit crunch).

My thoughts have switched to another Oceanic, this time the trilaminate Aerdura Black. With a choice of traditional back zip or front loader, Oceanic are now also offering the option of neoprene socks with rock boots above the standard boot.

It also looks cool all in black.


Someone described it as the "suit of choice" recently and I have to agree when looking at my budget. So next month I'll have to go for a fitting and let you know how it feels.

But if you have any other ideas, please let me know.

Monday, January 26, 2009

Regulator Free flow

What the weekend's cold water diving highlighted was the possibility of regulators going into free flow (where the second stage sticks open releasing a continuous stream of air), particularly during deep dives when the temperature of the water is at its coldest.

Thanks to Vinni at Aquasport International in Birmingham, below are a few easy steps to preventing free-flows and dealing with them should they happen.
  • Ensure your regulator is well maintained and serviced properly.
  • If you are using hose protectors, pull them down a little to expose the metal fittings at the first stage. These will act as a heat sink warming the air in the hose slightly before it reaches the second stage.
  • Keep your regulators in the passenger compartment of your car - not in the unheated boot - on the way to the dive site.
  • Ensure the inside of the regulator is kept dry, particularly between dives.
  • Don’t leave the air turned on for long periods of time between dives. Once you have checked the system after assembly, purge and switch off.
  • Avoid breathing into you second stage prior to buddy checks and avoid purging your regs.
  • Don’t leave equipment on the ground where it could be colder and damper than a few feet higher.

During the dive:

  • Set your ‘dial-a-breath’ resistance knob to it's least sensitive point where it requires most effort to crack it, and the venturi switch across the air flow.
  • Enter the water with you primary second stage in your mouth and the octopus mouthpiece down.
  • Try to avoid high impact entries, such as giant strides which put gear under strain.
  • Also avoid long surface swims which could leave you over-exerted and with a higher than normal breathing rate.
  • Keep your regulator in your mouth for the duration of the dive.
  • Try not to use the purge button at any point. If you have to use gently progressive pressure rather than one sharp stab
  • Avoid deep or strenuous dives which will push regulators to their limits.
  • Maintain proper buddy contact to ensure you are there for each other in the event of a problem.

If the worst does happen, stay calm and remember your training. We all trained to breath from a free flowing reg in our open water training and it is straight forward to ascend while doing so. You may find it stops at shallower depths.

You can also ascend on your buddy’s alternate. While doing so and if it is safe, get them to turn off your cylinder for a few moments and open the valve again slowly to see if the free-flow has subsided.

Thankfully, I've only ever had to bring one diver up from depth (20m) after a free-flow and the training kicked in perfectly. It's not as daunting as you might think.

Saturday, January 10, 2009

Green Force Torch

Below is my review of the Green Force AA12 trorch with Tristar Plus LED Dimmable head that I first posted on the Dive Magazine website in a bid to win a canvas Great White Shark print taken by Maria Munn of ocean Visions.
Apologies for the length but I've chucked everything in for you.


WITH LIGHTSABER LOOKS THEY'LL BE NO DARK SIDE UNDER WATER

Strengths:As tough as Chuck Norris, ruggedly stylish as Steve McQueen, flexible as Olga Korbett and as bright as the nerdy kid at school who always put their hand up when the teacher asked a question

Weaknesses:Not cheap. Clumsy divers risk flood it when switching it off and the different brightness settings require the reflexes of…someone with very good reflexes.

Writing a review on a dive torch always seemed somewhat pointless to me. You get into the water, turn it on and point the shiny end at the thing you want to see. If the lamp is any good said thing will exude a wonderful spectrum of colour. Simple. Straightforward. Job done.

But that was before I agonised for two months over whether to part with more than £350 notes for the Belgium-made Green Force AA12 Tristar Plus and struggled to find a truly warts-and-all independent perspective.

So what do you get for your money?Green Force torches are the Land Rover of dive lights, expensive but ruggedly stylish. The company’s selling point is that the system is completely modular. You buy a battery pack and marry it up with a light head of your choice, be it halogen, LED or HID. Then simply interchange and upgrade parts as you wish, or turn it from a hand torch to a cylinder-mounted umbilical, without having to splash out on the basics again.

My mid-priced pack came with an AA12 battery, Tristar Plus dimmable LED head, mains charger, charging pin, carry cases and towel, a package vastly cheaper than the sum of its parts.The unit works by screwing the head fully into the battery (or umbilical) until the connections meet.

Three O-rings provide protection from flooding and a half twist either way is enough to switch the light on or off. But here is my first quibble. While you have no switches to worry about leaking, a lot of hard-earned cash is being entrusted to three O-rings, and a diver’s grasp of half-a-turn. I fear some could flood their unit if not careful, or narked (yes, it happens to us all) by unscrewing it too far at depth. To avoid that I switched mine on just before hitting the water and left it on.The three o-rings require regular checks and battery is a bit high-maintenance. But that should keep many divers like me happy on the wet weekday nights when we long to be in the water.

Once assembled, the black-ridged battery cylinder and the greeny-gold aluminium light head resembled an underwater lightsaber (ok, I’m a child of the 70s) and I hit the water like some diving Jedi. Rather than buy the handle, I fixed a split ring and dog-clip to a hole in the battery casing (designed for the handle fixing) and hung it from a D-ring on the shoulder of my BCD. That allowed me to hold the torch comfortably without having to extend my arm in front of me and gave me peace of mind knowing that, should I let go, it would dangle from my jacket rather than vanish to the depths.

The Tristar Plus has three bright and unbreakable LEDs which deliver 30 watts but require very little power, giving 150 minutes of burn time with the AA12 battery. I easily got two 60 minute dives out of mine with no problems. but if that’s not enough, fit the head to the Flexi IV battery and get 960 minutes burn time. Oh, the beauty of a modular system.

The colour temperature of the LEDs is closer to natural daylight than halogen bulbs and helps replace colours normally lost to the blue (not as well as the costly HID heads do but I can always upgrade later). The 20-degree beam also produces a nice cool and evenly diffused light.

Diving the James Eagan Layne on a particularly bad day, it certainly helped slice through the murk and on a night dive, it illuminated so much reef I thought the sun had come up early. I didn't miss much on that dive. The dimmable LED head has three brightness settings, a strobe and an SOS.

And here is my second quibble. To switch between them you first have to turn the light on, then turn it off after less than five seconds, and then back on again. To go from maximum brightness to SOS you have to repeat the process four times. A bit of a fiddle and a faff and, 20m down, we all know five seconds becomes 15 in no time. It is a feature I can see few divers making full use of.

So, if after reading 750 odd words on a tube with a shiny end you're still asking if you should buy one, my answer is an unequivocal ‘Yes. For the Force is strong in this one.’

Wednesday, January 7, 2009

Scuba Diving Equipment Advice #1

After attending a scuba equipment seminar last night I thought I would pass on my advice for new divers when it comes to buying their own gear.

My first bit of advice is get kitted up as quickly as your wallet will allow - those with their own gear dive more. FACT. If you are learning it means you want to dive - and as much as possible - so get started with some kit.

So in the first of an occasional series, here's what to look for when buying a mask.

Find one that fits - place the mask lightly against your face and inhale slightly through the nose. The mask should sit on you face. Have someone peer into the mask to check the inner edge of the frame/skirt sits nicely against the face running either side of the face to the cheekbones. If it sticks out over the eyes, it's too small so try another.

Simple. But that is the easy bit. The trials and tribulations are now which one you pick from the plethora on the shelves of you dive store.

Go low volume - these are masks that sit the lenses closer to your eyes. This offers greater field of vision and are easier the clear when flooded. 'No-frame' designs reduce weight and provides one of the largest fields-of-view


see Tusa website

Lenses - should be made of tempered glass. Single-lens masks provide a broad, uninterrupted view but twin-lens masks have become increasingly popular because they typically have a lower internal volume.
They also allow for corrective lenses to be added for those with sight problems.
The size of the lens will affect the field of vision. Some masks now (like the Oceanic Neo 2, Tusa Visulator or Scubapro Spectra) have oversized lenses to increase the field of vision. Others such as the Oceanic Ion 3 and 4, Tusa Splendive IV or Scubapro Crystalvu have side windows to offer greater panoramic view for greater peripheral views.
Look for lenses such as Atomic's Ultraclear. Some lenses come with a green tint to them (place the mask over a piece of white paper to see) which is the result of iron impurities in low quality float or window type glass. This can distort colours underwater.
Some Atomic masks also come with anti-reflective coating which reduces the amount of light (between four and 12 per cent) reflected back by the lens surface to give a clearer, crisper view.

Skirting - Go for liquid or crystal silicone. It's softer and more durable and won't go rigid in cold water. Feathered edges where the skirt gradually thins out as it approaches the edge of the mask offer superior fit because they make contact more flexible. A double skirt offers an inner skirt around the inside of the mask which sits on the face, providing an extra seal and more comfortable fit.


see Tusa website

When it comes to colour, yes black looks cool but it may reduce light coming into the mask and give the impression of a restricted view, whereas a clear skirt will allow more light in and not have that problem.

Straps and buckles - make sure they have adjustable/swivel buckles to get a proper and comfortable fit. A neoprene slapstrap is also a good idea as it makes donning and doffing mask easier, sits more comfortably on your head and those with long hair won't get it snagged in the strap. Oceanic masks are now coming ready fitted with their own Neoprene Comfort Strap included.

Purge valves - some masks (Oceanic Ion 2, Scubapro Crystalvu Purge) come with a one way valve at the base of the nose pocket to make clearing easier without having to break the seal of the mask. As mask clearing without the valve isn't much more difficult the debate is still open about its use.

Once you've selected your mask, you might want to think about the matching snorkel, de-fog solution to help it stay clear and a mask bag for protection.

Hope that helps, happy shopping!